


TECHNICAL SUPPORT


Published 2026-02-08
Are you tired of basic digital output and want to get something cool that can "move"? For example, make a robotic arm that can be commanded by a remote control, a curtain that automatically opens and closes, or a small robot that turns its head to say hello? The core of realizing these ideas is to let the steering gear listen to the infrared remote control. This sounds a bit technical, but in fact, as long as you understand a few key points and connect the infrared receiver andservo, you can easily unlock new skills for remote control of objects.
Many friends who are new toservoapplications will encounter a problem: if they want to control the device remotely, do they have to go back to the computer to change the code and re-upload the program every time? This is so unrealistic. For example, if you want to make a sunshade for a smart flowerpot, do you have to manually adjust it several times a day according to the sunlight?
Infrared remote control solves this "last meter" control problem. It frees you from the shackles of data cables and allows you to command theservoto rotate to a preset angle just like using a TV remote control. This method is extremely low-cost, and an ordinary home appliance remote control or infrared transmitter module can do the job. It is very suitable for innovative projects that require instant, non-contact interaction.
It greatly improves project interactivity and completion. A work that can respond to remote control commands is immediately upgraded from a static "model" to a dynamic "device", and the user experience skyrockets. Second, it simplifies complex control logic. You don't need to write complex continuous motion algorithms for the servo, one button can correspond to a precise angle.
In terms of cost and learning curve, the infrared solution is also very friendly. The cost of a set of infrared receivers and transmitters is only a few yuan, and the relevant code libraries (such as ) are already very mature, and there are a large number of ready-made cases on the Internet for reference. This means you can focus more on creative implementation rather than delving into the underlying communication protocols.
For projects, the most common choice is an integrated infrared receiver or similar. It has only three pins: VCC, GND and OUT, making them very simple to connect. You need to pay attention to its working voltage, usually 3.3V or 5V, and make sure it matches your development board.
There is no need to pursue high-end models when choosing. This universal receiver is well compatible with most 38kHz carrier remote controls on the market (such as old TVs and air-conditioning remote controls). The key is to install it on the project shell, and there should be no dark or opaque materials in front of the infrared receiving window to avoid affecting signal reception.
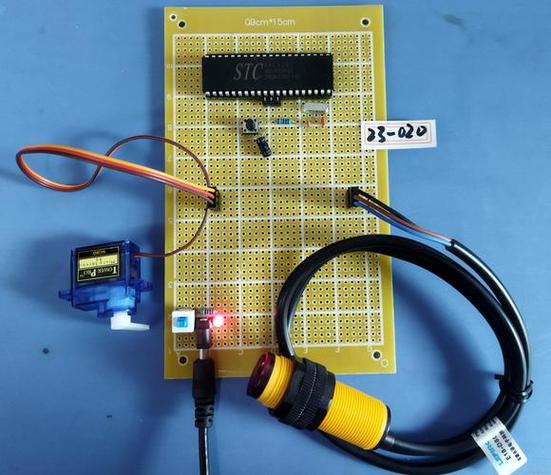
Hardware connection is the first and error-prone step. Powering the servo is key: if you only use a 9V battery to power the servo, and then take power from the 5V pin to the servo, when the servo rotates and freezes, it will easily cause the entire system to restart. The correct approach is to power the servo separately, or use a shared power supply that can provide sufficient current.
Recommended wiring sequence: first connect the VCC, GND, and OUT of the infrared receiver to 5V, GND, and a certain digital pin (such as No. 11) respectively. Then connect the signal wire of the servo (usually orange or white) to a digital pin that supports PWM (such as No. 9). The red wire is connected to the positive pole and the brown wire is connected to the negative pole. Make sure everything is correct before powering on.
You need to install the "" library in the IDE first. At the beginning of the code, introduce this library and define the infrared receiving pin and servo pin. In the initialization part, start the infrared receiver and servo objects. In the main loop, the core task is to constantly check whether infrared signals are received.
Using the decoding function provided by the library, the received infrared signal can be decoded into a specific numerical code. Each key corresponds to a unique code. You can print out and record these codes through the serial monitor and press the remote control button. You can then use the "if" statement to judge: if code A is received, let the servo turn to 30 degrees; if code B is received, turn the servo to 120 degrees.
Use the remote control to test and record the infrared codes corresponding to the several buttons you plan to use. Then, write corresponding steering gear control functions for these codes in the code. The "write()" function of the servo library can directly specify the angle, usually ranging from 0 to 180 degrees.
To make the control smoother, you can add a small delay when the angle changes. In addition, consider adding some error handling mechanisms, such as ignoring the same signal when it is received continuously to prevent the servo from shaking repeatedly. After you finish writing and uploading the code, point the remote control at the receiver and press the button, and your servo should move in response. If there is no response, go back and check whether the wiring, power supply and infrared encoding are correct.
Give it a try. Starting from controlling a fixed angle with one button, you can quickly experience the fun of remote control. What will be the first creative project you want to do using an infrared remote control servo? Welcome to share your thoughts in the comment area. If you find this article helpful, don’t forget to like and share it with more friends in need.
Update Time:2026-02-08
Contact Kpower's product specialist to recommend suitable motor or gearbox for your product.


